
Here is an illustrated guide on how I make low abv beer (around 1.5%) using a process called cold extraction.
Adjusting a Recipe for a Cold Extraction Brew
Grain Bill
When I make a cold extraction brew, I start with a “normal” grain bill. By “normal” I mean full strength and not something in the 1-2% abv arena. Once I have entered my malt bill into Brewfather, I turn down the the mash efficiency to 25%. Doing so usually gives me a decent prediction for original and final gravity.
Hops
As for hops, I’ve gone very light on all of the recipes I brewed so far. I keep the predicted IBUs low around 10-15. So far I’ve made a saison, a brown ale, and an oatmeal stout. In the future, I’d like to try a crack at something hoppy, especially, since polyphenols (tannins) can boost the mouthfeel.
Yeast
I’m guilty of over pitching every time I’ve made a cold extraction table beer. In hind site, I’m probably not doing myself any favors (when it comes to the flavor profile of the beer) and advise using a calculator to estimate the appropriate amount of yeast to pitch. Assuming a starting gravity of 1.018 you would need 72 billion cells for an ale. Most liquid yeast packs come with about 100 billion cells. See the Brewer’s Friend yeast calculator here.
The Process
Add BIAB Bag, Grain, and Cold Water

I add enough water to cover the grain. Use a brew bag and a five gallon bucket. Remember to write down how much water was used and subtract from the total needed for the brew.
Extract

There are two approaches to get extraction. I use the passive one. Just set the bucket in a fridge for 8 hours or more and Bob’s your uncle. You could use a recirculating system and “stir” for an hour and forget about the fridge. I’ve never tried it but the guys or guy at Briess say(s) it works.
Pull the Bag and Transfer to the Kettle
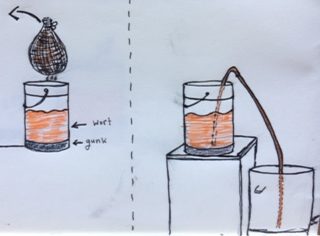
This step has one pitfall. If you’re not careful you will transfer a large amount of sediment that has collected on the bottom of the bucket. Avoid this sludge as it will end up burned to bottom of your kettle if it makes it into the kettle.
Top Up the Kettle, Bring to Conversion Temp, and Rest

Once I’ve got my total pre-boil volume I like to do a gravity check.
The conversion rest step is possibly skip-able. Depending on how fast you can bring you cold wort up to temp you could be getting a lot of or almost all your needed conversion. But I like to stop and rest at 67° C for 45 minutes. Of course your rest temp and duration is dependent on the recipe and desired outcome.
After that, it’s back to the usual process: boil, chill, pitch, ferment, and package.
Feel free to comment below!


3 thoughts on “Illustrated Steps for Brewing Cold Extraction Table Beer”
Hi,
Great series on cold extraction beer making. I have investigated a few options for making low ABV beers that taste like the full strength versions and this technique looks like the most promising yet.
What is the next beer you plan to make as a cold extraction version?
Max, thanks for the feedback. I’ve wanted to try some Saison recipes again. The simplest idea is to use a single malt, probably Maris Otter, or something known to impart more flavor. I also think that mixed fermentations could produce interesting results.
Let me know what you brew and how it turns out.
I’m a fan of traditional Berliner Weiss (not a kettle sour) and the low abv of the original would lend itself to be replicated in a even lower abv beer brewed with the cold extraction method.
This step-by-step guide to brewing cold extraction table beer is fantastic! The illustrations make the process so much easier to follow. A great resource for homebrewers looking to experiment with smooth, low-ABV beers. Cheers to creative brewing